Getting started
Welcome to HalloID! This is just the beginning of our very awesome journey <3
This page contains all official documentation for HalloID. We strongly recommend to go through the different topics and use cases in order to get the max benefit and information to improve your Authentication process. We are actively updating these docs with the latest releases, if you want to stay tuned, subscribe to our technical blog ;)
- Version: 1.0
- Author: HalloID Dev Team
- Created: 19 October, 2022
- Update: 06 April, 2023
If you have any questions that are beyond the scope of this documents, find our contact information in our HalloID Support Page.
Local setup
Deploy a local instance of HalloID in just one single step.
HalloID offers a local environment distribution to start integrating your application and testing our platform. This is also very useful for e2e automated tests.
What you already need:
- Docker compose
- A computer with any biometric authentication device (FaceID, TouchID, YubiKey)
Now, create a file with this content and save it as docker-compose.yml:
                        version: "3.8"
                        services:
                        halloid-authenticator:
                            container_name: halloid-authenticator
                            image: halloid/halloid-authenticator:latest
                            pull_policy: always
                            ports:
                            - "8081:8081"

                        halloid-controller:
                            container_name: halloid-controller
                            image: halloid/halloid-controller:latest
                            pull_policy: always
                            ports:
                            - "10000:10000"
                            environment:
                            - FIDO_AUTHENTICATOR_URL=http://halloid-authenticator:8081
                            - ALLOWED_ORIGIN=<-YOUR-CLIENT-ORIGIN>
                            depends_on:
                            - halloid-authenticator

                        halloid-console:
                            container_name: halloid-console
                            image: halloid/halloid-console:latest
                            pull_policy: always
                            ports:
                            - "3000:80"
                            depends_on:
                            - halloid-controller
Once you have the file ready, only step you need to do is execute the
docker-compose up command. This will deploy a minified version of HalloID in your local
environment, ideal for testing and development. Of course, the version is minified regarding
resources consumption, but you can expect the same features as our cloud environment.
Once the 3 containers are running, let's open the HalloID Console in localhost:3000. The first screen you will see will be the Tenant setup, let's start configuring our new account..
This local version runs with embedded database. Any time you restart the container, all data will be lost.
Tenant onboarding
A tenant is the owner of a HalloID account. As owner, you have administrator privileges over the clients registered, authenticated users and access keys. To start using your account, first you need to add a name and domain for your tenant:
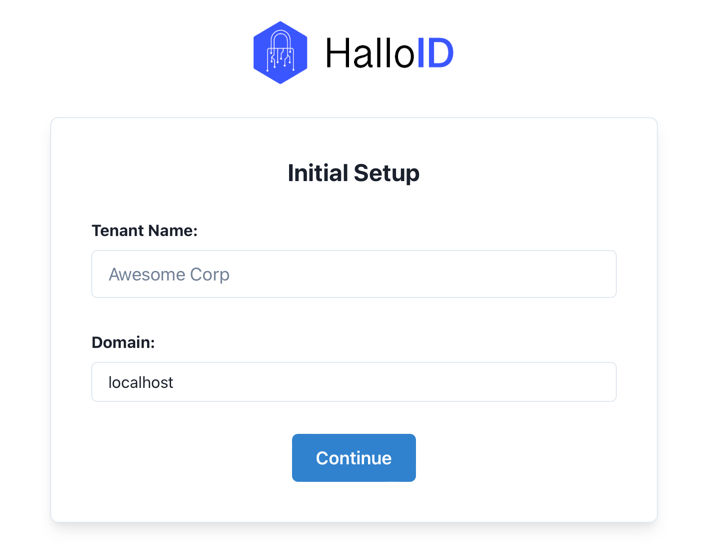
- Tenant Name: Normally the company name, but could be whatever name to help you identify this account independent of other ones. Example: My Awesome Company
-
Domain: This parameter will be used to configure HalloID to create a custom
subdomain, so login request from unknown domains are not allowed. Example: If your company
domain is
my-awesome-company.com, your subdomain will bemy-awesome-company.halloid.io
Keep in mind: For the local environment, the domain will always be localhost
Once your tenant is configured, you will have access to the HalloID dashboard.
Create your first client
A client is any application you want to attach to your HalloID account. The tenant defines the domain where your clients will connect, this custom domain should be use for all your clients in order to make requests to HalloID. As you may see, there are no registered clients yet, let's start adding a new one:
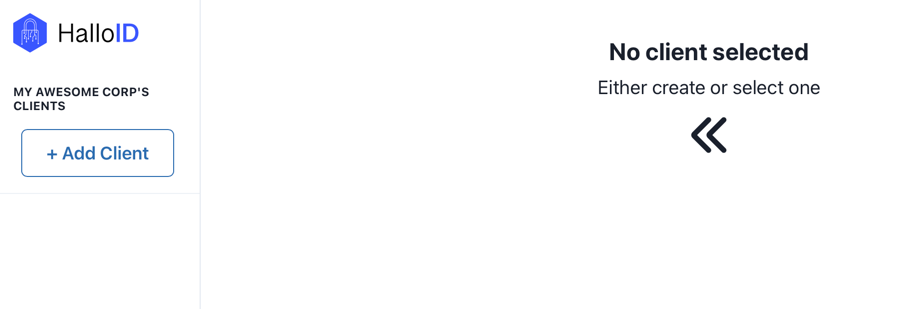
Click on Add Client. Let's now start configuring our client:
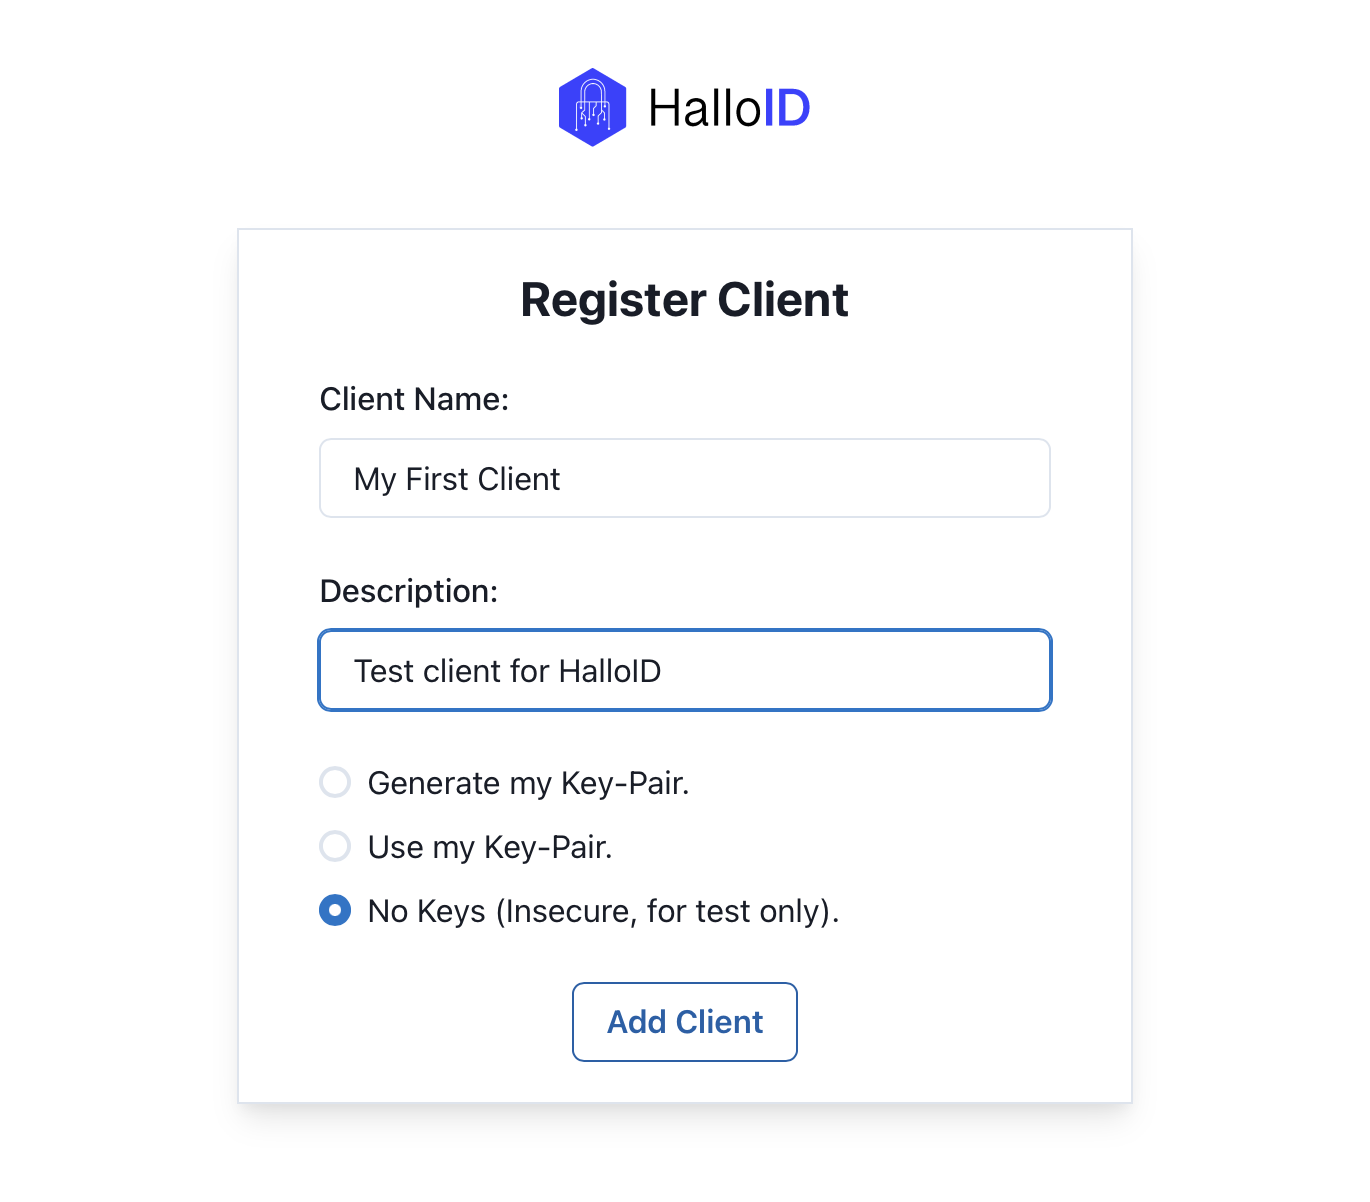
The register client form has 3 parameters:
- Client Name: The name for the application connecting with this client. Example:
delivery-app - Description: A quick description about the usage of this client and what represents in your HalloID account. Example: Client to authenticate delivery app users in production env.
The next parameter is very important and we have and entire topic about it ;)
Security keys
In this section let's talk about how security keys works in HalloID.
By default, HalloID offers the option to use no security keys in order to test direclty the passwordless login with your web client. This option is the best for local development environments, but never use it in production. If you have selected this choice, you can skip the next section and go to direclty to Web App Login
Why security keys?
With security keys we make sure the request made by your client comes from you and not from a third party service (such a hacker or phishing software) using the service token. On the other side, you also make sure all information send from HalloID (such Authorization tokens) really comes from our platform.
As you may know, security keys are generated in pairs: A public key, and a private key. The public key is meant to be shared with other services, while the private key shall remain in your application backend, stored in your server or even better in a Vault. For example, every time you perform a request to HalloID, your need to attach a service token in the header signed with your private key. In that way, HalloID stores your public key, and we will use it in order to validate the token signature: If the service token is indeed signed with your private key, the only key can verify it is the public key. If validation is not successful, then the request is denied. Same way, HalloID shares his public key in order to let our clients verify all authentication tokens are signed by our platform, at this way we prevent undesired interventions in the Authentication process.
HalloID gives you 2 options in order to store your key pais:
If you select the first option, HalloID will generate a key pair for you
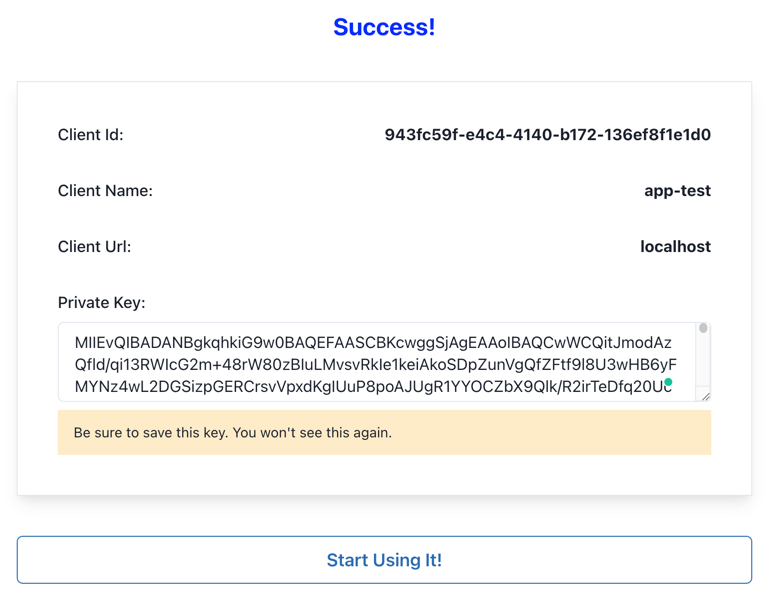
Please pay attention to the message in the bottom: HalloID will only save the generated public key, you will see the private key only once, so please, save it in a safe place.
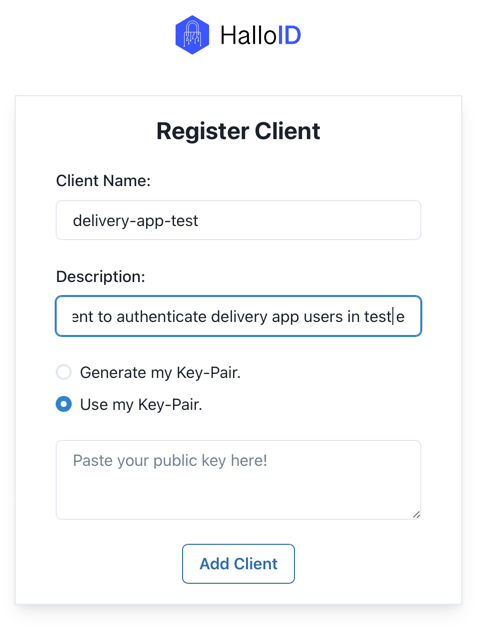
The second options is to generate your key pais by your own and provide the public key to be stored by HalloID:
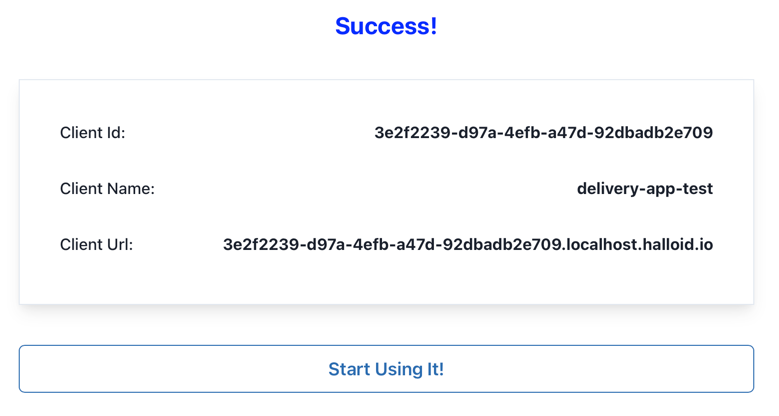
Once your paste your public key, you will see the success message followed by the client details:
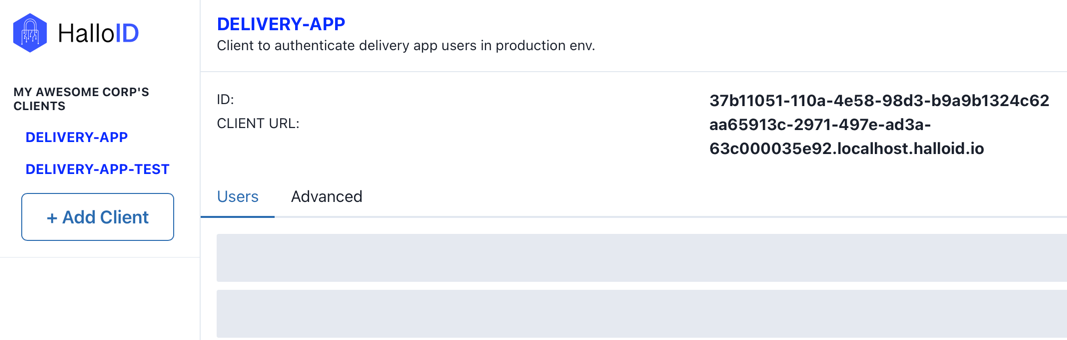
Now, you are able to access your client details in the HalloID dashboard:
And that's all configuration you need to start using HalloID to authenticate your users. In the next section, let's explore how to configure a web application to make login via HalloID.
HalloID public key
To improve security, HalloID perform key pair rotation randomly in the cloud environment. For
on-premise instances, you are responsible for managing key pair rotation.
In both cases, HalloID provides an endpoint in halloid-controller service to get
the current public-key value:
                        // For local environment
                        GET http://localhost:10000/v1/config/publickey
Web App Login
You can integrate your web application with HalloID using our
Web SDK. To install, just execute
the following command: npm i halloid-web-sdk
Once installed, you need to configure your client URL and client ID with the values generated in the HalloID console (see previous steps)
Important: Don't forget to add your web application domain as environment variable in the docker-compose
file ALLOWED_ORIGIN= <-YOUR-CLIENT-ORIGIN>,
example: ALLOWED_ORIGIN=http://localhost:8090
                        import HalloIDWebSDK from "halloid-web-sdk";

                        halloClient: HalloIDWebSDK

                        // ...Class code

                        constructor() {

                          this.halloClient = new HalloIDWebSDK("CLIENT_URL", "CLIENT_ID"); // CLIENT_URL=http://localhost:10000
                        }
And now only thing you need is start using the register/login methods:
                        myUserRegistrationFunction(username: string) {
                            await this.halloClient.registerUser(username).then(response => {
                                console.log(response) // Returns the signed JWT token
                              }).catch(reason => {
                                console.log(reason)
                              });
                        }

                        myUserLoginFunction(username: string) {
                            await this.halloClient.login(username).then(response => {
                                console.log(response) // Returns the signed JWT token
                              }).catch(reason => {
                                console.log(reason)
                              });
                        }
The service token
Optionally, if you selected the option to use a key pair, you can send a Service Token as parameter with the login/register method. More information in the Use Cases section.
Use cases
HalloID covers the basic use cases for user authentication. We will add more features in our next releases, so this section is updated very often :D
Login to Web Application
The main use case to start with HalloID is allowing your users to login without any passwords. Our mission is clear: We want to provide the best and simple experience configuring a safe passwordless login method in your web application, without breaking any internal process you have. To start, HalloID defines 3 main components:
- Account created and configured in HalloID platform (Client params, key pair)
- HalloID Web SDK
- HalloID Backend SDK (optional, but recommended)
Let's start!
Configuring the Web Application
Once you have a configured HalloID client, is time to start with the SDK configuration. The HalloID Web SDK will perform all requests to HalloID, even web or on premise installation. For this purpose, in your web application, just need to configure the SDK as follows:
First, you must run npm install halloid-web-sdk in your web project.
Then, in your project code:
                        // Import the HalloID Web SDK
                        import HalloIDWebSDK from "halloid-web-sdk";

                        .
                        .
                        .

                        // Init the SDK with the required params
                        halloClient: HalloIDWebSDK

                        // Class code
                            constructor() {
                              this.halloIDClient = new HalloIDWebSDK("TENANT_URL", "CLIENT_ID");
                            }
If you need specific details about the HalloID Web SDK, we have an entire section with all details
in the Software Development Kit section.
Now, let's implement login() and registerUser() methods:
                        await this.halloClient.registerUser("username", "SERVICE_TOKEN").then(response => {
                            console.log(response) //Returns the signed JWT token
                          }).catch(reason => {
                            console.log(reason)
                          });

                        await this.halloClient.login("username", "SERVICE_TOKEN").then(response => {
                            console.log(response) //Returns the signed JWT token
                          }).catch(reason => {
                            console.log(reason)
                          });
The Service token
HalloID use the service token to validate if the request was made for a valid client registered by you. This process is very simple:
- In the onboarding process, you generated a RSA key pais in HalloID, or generated a key pair by yourself and uploaded the public key to HalloID
- Using the private key, you must generate a JWT used as service token signed with your private key
- This token is sent as header via HalloID SDK (you don't need to worry about this)
- For each request, HalloID will validate the JWT signature using the public key you generated/uplodaded in the onboarding process.
Since web applications are client side applications, we don't recommend to store sensitive information in the web app code, such the private key. Of course, this will depend a lot on your current implementation, but our recommendation is to have a server side application able to generate and sign JWT for you. To make this process simple, HalloID provides also a backend SDK.
Server side implementation
We will use our Java SDK to generate and validate the JWT.
First, you must include implementation files('lib/halloid-java-sdk-1.0-SNAPSHOT-all.jar')
in your project (we are using Gradle for this example).
Then, in your application.yml:
                        halloId:
                          client:
                            id: YOUR CLIENT ID
                            privateKey: |
                              -----BEGIN PRIVATE KEY-----
                              YOUR PRIVATE KEY
                              -----END PRIVATE KEY-----

                          publicKey: |
                            -----BEGIN PUBLIC KEY-----
                            HALLOID PUBLIC KEY
                            -----END PUBLIC KEY-----
We recommend to use a vault service to store this information in non-local environments, then inject them via environment variables. What we have here is:
halloid.client.id: Generated ClientIDhalloid.client.privateKey: Your private Keyhalloid.publicKey: HalloID public key
You can retrieve the halloID public key from GET http://localhost:10000/v1/config/publickey. More info in the HalloID Public Key topic.
Once the parameters are configured, just initialize the HalloIDJavaSDK and call
the generateServiceToken() method:
                            @Service
                            public class TokenService {

                                private final HalloIDJavaSDK halloIDJavaSDK;

                                public TokenService(@Value("${halloId.client.id}") String clientID,
                                                    @Value("${halloId.client.privateKey}") String privateKey,
                                                    @Value("${halloId.publicKey}") String halloIdPublicKey) {
                                    this.halloIDJavaSDK = new HalloIDJavaSDK(clientID, privateKey, halloIdPublicKey);
                                }

                                public String generateToken(){
                                    return halloIDJavaSDK.generateServiceToken();
                                }
                            }
Now, just expose the method to be consumed by your Web client. You can now generate service tokens for each request.
                            // Example for web app
                            public async registerWithHalloID() {
                                await this.generateServiceToken()
                                  .then(serviceToken => {
                                    return this.halloClient.registerUser(this.username, serviceToken)
                                  })
                                  .then(response => {
                                    this.processResponse(response.authorizationToken)
                                  });
                              }
Now, your users are able to make request safely to HalloID and perform passwordless login!
If the login is successful, HalloID will generate a JWT with login details and signed with
HalloID Private Key. From your side, we recommend to validate this token was generated
by HalloID. The Java SDK also offers the validateToken() method:
                            public AuthenticationResponse validateToken(String token) {
                                return this.halloIDJavaSDK.validateJWT(token);
                            }
This method uses the configured HalloID Public Key to validate JWT signature. Now you can continue with your Authorization process, the user is valid now ;)
Code Examples:
We have available 2 projects to show you how to implement a passwordless login using HalloID.
Transaction Validation
This feature is part of the next release of HalloID v1.1.0
Software Development Kit
HalloID is a platform made by developers for developers, so we put a lot of effort to make development process easy, fast and reliable.
Web JS SDK
This SDK makes easy to integrate with HalloID in web applications.
Installation
To get the latest version, use the following command: npm i halloid-web-sdk
Initialize
To start using the web SDK, initialize the HalloWebSDK as follows:
                        // Import the HalloID Web SDK
                        import HalloIDWebSDK from "halloid-web-sdk";

                        .
                        .
                        .

                        // Init the SDK with the required params
                        halloClient: HalloIDWebSDK

                        // Class code
                            constructor() {
                              this.halloIDClient = new HalloIDWebSDK("TENANT_URL", "CLIENT_ID");
                            }
Required parameters:
TENANT_URL: URL generated in HalloID console for your registered clientCLIENT_ID: Alphanumeric code generated in HalloID console for your registered client
Methods
Is browser supported?
All modern browsers actually support webauthn API, but in case you want to double-check it before
executing any operation, just call the isBrowserSupported method.
this.halloClient.isBrowserSupported()
Required parameters
This method does not require any params.
Response:
TRUE/FALSE: Returns a boolean expression depending if the browser supports WebAuthn operations.
Register user
Register a new user in HalloID
                        await this.halloClient.registerUser("USERNAME", "SERVICE_TOKEN").then(response => {
                            console.log(response) //Returns the signed JWT token
                          }).catch(reason => {
                            console.log(reason)
                          });
Required parameters
USERNAME: Username read from the input text.
Optional parameters
SERVICE_TOKEN: Generated JWT signed with the tenant private key.
Response:
200 OK: Returns JWT signed with HalloID private key. You can use HalloID public key to validate the token is from HalloID. The token contains information such username, issuer, sub and client ID.404 NOT FOUND: Returns 404 if the client ID parameter doesn't match any value in HalloID.
Login
Login a registered user with in HalloID
                        await this.halloClient.login("USERNAME", "SERVICE_TOKEN").then(response => {
                            console.log(response) //Returns the signed JWT token
                          }).catch(reason => {
                            console.log(reason)
                          });
Required parameters
USERNAME: Username read from the input text.
Optional parameters
SERVICE_TOKEN: Generated JWT signed with the tenant private key.
Response:
200 OK: Returns JWT signed with HalloID private key. You can use HalloID public key to validate the token is from HalloID. The token contains information such username, issuer, sub and client ID.404 NOT FOUND: Returns 404 if the username or client ID parameter doesn't match any value in HalloID.
Server Java SDK
The server SDK offers useful methods to make integration with HalloID easier and safe.
Generating the SDK
HalloID open-sourced the Java SDK to be used as example about generation and validation of key pairs. The repository is public and you can find it in HalloID GitHub. Instructions for generating the package are available in the repo README. If you want to skip the generation of the SDK, you can also use the released package available in HalloID Java SDK Releases (GitHub)
Installation
- Gradle:
implementation files('lib/halloid-java-sdk-1.0.0.jar')
Initialize
To start using the Java SDK, initialize the HalloIDJavaSDK as follows:
                        private final HalloIDJavaSDK halloIDJavaSDK;

                        // Initialize the SDK with the retrieved values from the properties file
                        public TokenService(@Value("${halloId.client.id}") String clientID,
                                            @Value("${halloId.client.privateKey}") String privateKey,
                                            @Value("${halloId.publicKey}") String halloIdPublicKey) {
                            this.halloIDJavaSDK = new HalloIDJavaSDK(clientID, privateKey, halloIdPublicKey);
                        }
Required parameters:
clientId: Alphanumeric code generated in HalloID console for your registered clientprivateKey: The private key from the registered client in HalloIDpublicKey: HalloID public key
Methods
Generate token
Generate a JWT service token signed with your private key.
                        public String generateToken(){
                            return halloIDJavaSDK.generateServiceToken();
                        }
Required parameters
This method does not require any params.
Response:
- This method returns a JWT signed with your privateKey
Validate token
Validate authentication token received by HalloID using HalloID public key.
                        public AuthenticationResponse validateToken(String token) {
                            return this.halloIDJavaSDK.validateJWT(token);
                        }
Required parameters
The received authentication token from HalloID.
Response:
This method returns a JSON payload with the following parameters:
authorizationToken: The returned JWT from HalloIDtokenVerified: true/false if the verification process is successfuluserVerified: true/false from HalloID outcomeusername: The logged in usernametimeout: Token lifetime (default 1h)jwtBody: Parsed JWT body
Server Node SDK
Work in progress.
FAQ
Do you have questions? Check the most frequently asked questions here ;).
Support
Do you have more questions? Please send us an Email to contact@halloid.io
Our team is based on GMT +1 Timezone, so depending on your region our answers can take some time, but never more than 24h.
Changelog
See what's new added, changed, fixed, improved or updated in the latest versions.
Are you curious about our next updates? Follow us in our social media accounts and stay tuned!
Version 1.0 (09 Jan, 2023)
- Added Disabling mandatory key pair.
- Added First release.